Showing posts with label recipes. Show all posts

Wednesday, April 15, 2020

Fresh Spring Rolls Recipe

It's spring time!   The mint is in bloom!   That means it's time for spring rolls.

Spring rolls are really easy to make, and you can add a variety of things to them.  In summer time, I particularly like to add fresh basil to them - especially after it's bloomed when the leaves take on a more peppery flavor.

Some of my friends enjoy dipping these in peanut sauce.  I enjoy dipping them in sweet thai chili sauce.  It's a lot of fun to get a bunch of different sauces together and try them out.  Maybe some hoisin, or plum sauce, or even just regular duck sauce.   Y'all do you.

Please note that this recipe does not contain measurements.  See the last paragraph for measurement guidelines.  This is definitely more of an advanced recipe in that regard.  You'll be able to taste what is right for your palate, and I am not going to hold you back from your destiny in that regard.  I have included pictures below as well so that you don't have to scroll thru them to get to the recipe (I friggin hate that).

Fresh Spring Rolls


  • Cellophane Noodles (the thin ones used in Mai Fun)
  • Cellophane wrapper papers
  • Precooked jumbo shrimp  (or chicken, or crab, or anything else you want to put in)
  • Dipping sauce of your choice (mine is the sweet thai chili)
  • Sesame Oil or Rice wine vinegar  (or both)
  • Cheap garden salad blend (the iceberg with the carrots)
  • Fresh Mint, Fresh Basil, or any other fresh herbs you want to use.  Sometimes I use both.
  • Chinese Five Spice Powder
  • Salt & Pepper

Thaw the shrimp under running water.  Take any of the shells off if you need to.  If doing chicken or crab, prepare them how you want to.  Make sure that they're cold, but not frozen.

Prepare cellophane noodles according to package directions.  (usually it's boil till they're translucent, and then drain them.)   Run them under cool water in a colander when complete till they are cold.  You can add them back to the same pot, as long as the pot is cold as well.  You may wish to cut them for ease of eating and working with.  If so, I use the Pampered Chef Salad Choppers.    Add some of the ricewine vinegar and sesame oil to this and massage into the noodles.  Just enough that they're not soggy.  You'll want them to be dry enough to have the ricepaper wrapper stick to them.  Add salt and pepper as well.  *you might also consider adding Lemongrass or Lime essential oil.  But, only a drop or two.*

In a bowl, I use the salad choppers again to mince the salad and the herbs together.  chop it very fine, and add the five spice powder to taste.

Now that everything is ready to roll, it's time to work with the cellophane wrappers.  It's best to have an area with a cutting board set near your sink.  And everything around it that you intend to put inside your spring roll.  Take the wrapper in your non-dominant hand.  Run it under warm water on one side and then flip it and continue to run it under water,  until it is pliant and molding to your hand.  Then, using your dominant hand to help, lay it onto the cutting board flat.

Stuff like a burrito.  I like to put the shrimp down first, then the salad, and then the rice noodles.  Then you wrap it like a burrito, by tucking the sides in, and wrapping one of the long edges around everything, and the other long edge on top of it.  They will stick together.  Quickly transfer it to a plate, seam down.  Dry your hands and grab another cellophane wrapper (if you get them wet, they will stick together).  Repeat process till you have made the desired amount.

Serving size is usually 2 spring rolls per person.  I find that if I use about 2 cups of the salad (before chopping into tiny shreds, and 6 shrimp, and 1 of the blocks inside the cellophane noodle package, that it's about enough.  However, if you make too much noodles or salad, you can combine them together, and store in the fridge in an airtight container until you are ready to use them again.   They'll keep for a couple of days.  So, you can always prep the filling in advance.


Shopping List:  The Cellophane items, I got at Food Lion. 
The salad, and shrimp I got at Aldi.
 I grow the mint (not pictured) myself.
Additions, but not necessary.

One row of cellophane noodles
(there were 3 in the package)

Thaw the shrimp, peel the tails off.

Tail Shells off and ready for wrapping.

This is about 7 leaves of mint from the garden.

Add the salad to a bowl.

This is about 2 - 3 cups worth before
chopping

Add the mint and chop.

You can see how much it shrunk.

Add Five Spice Powder too the mixture and stir.

Brings it down to about 1 & 1/2 cups


Cellophane noodles look like this when done.

Rinse them (and the pot) with cold water.

Shake all the excess moisture from them.
You might even want to get a paper towel to try them a bit.

This shows that there is no moisture
left in the pan.  The noodles will be
damp, but not soaking wet.
I've already added the salt, pepper, two
shakes of the vinegar, and a drop of
the sesame oil.  And there is still no
residual moisture lingering.


Chopping them up just a bit to make it easier to eat and handle.
1 - You can tell that this wrapper has a pattern.
The pattern goes invisible when it's warmed.
Hold it like this.
3 - Now it's ready, when it starts to
fold around your fingers.
2 - It begins to go clear, but it's still
pretty rigid

Lay it flat on the cutting board

Add Shrimp

Add salad mixture on top.  Best to use your hands for all of this.


Add the noodles on top.  Careful not to over stuff.

Fold your two shortest ends inward

Fold one of the lengths over, and then the last one on top of it.

Finished product.
There is some left over that I will keep for another spring roll in the future.  When I thaw more shrimp.  I've mixed the cello noodles and the salad mixture together here.


Wednesday, March 26, 2014

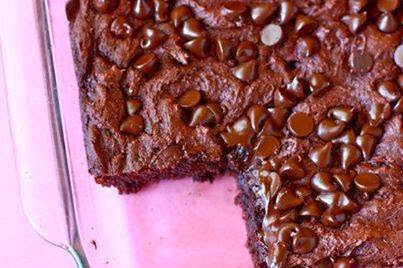
Chocolate Pudding Dump Cake

Know what I hate?  The fact that pintrest and facebook don't get along.  So, I'm posting this recipe here (even though it's not mine) since I found it on Facebook.  Link below if you'd like to follow her.  Also, just to be clear, this is not my picture or my recipe.  I just want to be able to pin it!

Chocolate Pudding Dump Cake

Ingredients:

  • 1 chocolate boxed cake mix
  • 1 small package instant chocolate pudding
  • 1 1/2 cups milk
  • 1 1/2 cups (large handful) chocolate chips
Directions:
  • Preheat oven to 350 degrees.
  • Prepare the pudding with the milk according to package directions. Add the cake mix and stir well to combine (batter will be thick).
  • Smooth batter into a greased 8-inch pan. Scatter chocolate chips on top.
  • Bake for 30 minutes, or until edges pull away from sides.

https://www.facebook.com/hillbillyrecipes

Wednesday, November 20, 2013

Winter Sore Throat Tea

I ran across something on Facebook that I wanted to pin to Pintrest.  However, because pintrest and facebook hate each other (well, perhaps "hate" is too strong a word...I should instead say that Facebook "ignores" Pintrest; but Pintrest acknowledges Facebook like a younger sibling trying its best to gain the attention of the elder); I was unable to pin it.  

Normally, that's not a problem, as I'll grab the image and a few key things, as well as the Facebook page where I got it from (so that there is credit where it's due).  But Pintrest was not in a good mood this morning, as the instructions are more than 500 characters, even with a few key edits to cut down on characters, without losing the key instruction.

So, all that I can possibly do, is to re-state it here, and pin from here.  But, just so we're clear, this is NOT my recipe.  The facebook image page is linked below so that you can find it directly, and also other things that they've posted.

The one thing I would add, is that I think (if possible) you'd want to use organic EVERYthing, because the last thing you need is pesticides on your throat, making it feel even worse.


That being said, without further ado, I present:
"
~~~~~Winter Sore Throat Tea~~~~~~

Make sure you have some of this ready...great recipe for sore throats and chest colds

.....makes about 2 cups

1. Two lemons thoroughly cleaned and sliced
2. Two pieces of ginger about the size of your pointer and middle finger together sliced into coin size pieces
3. Honey (about 1 cup-maybe more)

In a 12-16 oz. jar combine lemon slices and sliced ginger.
Pour honey (organic is best) over it slowly. This may take a little time to let the honey sink down and around the lemon and ginger slices. Make sure when the honey has filled in all the voids, there is enough to cover the top of the lemon slices.
Close jar and put it in the fridge, it will form into a "jelly". To serve: Spoon jelly into mug and pour boiling water over it.
Store in fridge 2-3 months.

Remember to Share.... Sharing is Caring....

Visit our Page And Join -► Wallpapers ◄- For more 

"

Original image link with instructions:
https://www.facebook.com/photo.php?fbid=702662736418131&set=a.596953746989031.1073741828.596950523656020&type=1&theater

Monday, July 29, 2013

Recipe: Fig Galette

Hello you all!  I know it's been awhile since I posted anything.  Truth be told, I really haven't been doing much of anything.

There's a gardener-extraordinaire in our work building, when she has an abundance of things from her garden, she'll bring some in so that her coworkers with purple thumbs can enjoy.  Last week, she brought in the biggest figs I'd ever seen in my life!  They were about as big as the palm of my hand.  And they were super juicy.  So, I decided to make a fig galette (because, let's face it people - I'm lazy and can't make a full freaking pie!)  It turned out wonderfully, and I wanted to share the recipe and my tweaks with you all.

So, without further ado:  Fig Galette  (Original Recipe here)


  • 1 Pie Crust  (I used a pillsbury un-rollable kind)
  • 4 - 6 excellent large sized figs
  • about 1/4 cup of jam (I used red currant, because that's all I had, darn it!)
  • 2 Tablespoons sugar
  • chop up your figs
  • With extra juicy figs, add 2 Tablespoons of corn starch


Step 1: preheat your oven to 375 Farenheit.  Gather your ingredients, and cut your figs up into quarters and then eighths.  Add them to a bowl or ziploc bag for mixing the sugars and things together later.

oil your dish (this is the
mini-baker from Pampered
Chef.)
Step 2: Get yourself a dish with sides, because honestly, a galette is a pain in the arse.  They want you to use a cookie sheet and just gently fold the dough over.  Well, I'm going to tell you, that's really hard to keep all together.  So, just get a sided dish.  Add some butter (I used coconut oil) to the bottom of the dish so that your pie crust doesn't stick.  Make sure that you spread the oil all around the base of the dish.

Step 3: Roll out your dough into your dish.  luckily, since you have sides, it doesn't have to be perfect because the sides will catch the juice that overflows.

mix your stuff
Step 4: Spread some jelly on that base.  I just guessed, honestly.  It looked like about 3 -4 tablespoons that I used...so a quarter cup is probably accurate.

Step 5:  Mix the sugar and the cornstarch together with the figs.  I had a lid with this container, so I used it and shook the mix up.

Pleat your galette
Step 6:  Pour your stuff into the crust.  and then fold the crust over the sides.  You can attempt to make it all beautiful by artfully pleating the crust as was mentioned in step 3 of the original recipe.  But honestly, who has the time and patience for this?  Mine looked just fine, thankyouverrymuch.

The finished piece
Step 7: Bake for 40-50 minutes until your house smells ridiculously delicious and the crust is starting to get flaky and brown.  Then let it stand cooling for another 15, but preferably 30 - if you can stand it!

Note:  I originally used half of the sugar and added honey for the other tablespoon, but I think the honey overpowered it a bit.  So, I'd probably just use straight sugar next time.

Monday, September 17, 2012

White Castle Burgers

Growing up with a father from the mid-west, one of the highlights when we would roll into St. Louis would be heading to White Castle.  Now, I know you either love them or hate them, being exposed to them as a kid, I admit, I love them!  The whole experience of seeing them on the griddle and all those little tiny buns being toasted on them as well.  I think it's part adorableness-factor, and the other part deliciousness-factor, that makes me love the Castle.  (oh and anything associated with the word "Castle" is okay by Princess ME!)

So, it is shocking to me that when I googled for a recipe for traditional sliders, and I came across this recipe (which I admit I skimmed, but got the gist of) for sliders, and I took it home to create beautiful sliders NOT REALIZING that "traditional sliders" taste just like White Castle burgers.  Remember, I skimmed the article, so I didn't see the whole "White Castle" thing at the very beginning.  I'm just interested in the recipe, not the story behind it!  

So, without further ado - Princess ME bequeaths upon you:

yummy!!!

Off-White Castle Burgers

recipe makes 6 "dinner roll" sized burgers

Put the buns in a lowly heated toaster oven (say about 150 or so) to warm them up (because I do NOT need to soak up extra grease, no matter if that is the way the castle does it! 

Slice the onion so that it fits in a food processor (I used my mini food processor, so I sliced mine in half, and then into smaller pieces.  Create a finely chopped onion with food processor (almost turns into a mince with lots of juice).  Salt the onions.

Add beef to a bowl and add the onion and about a tablespoon of olive oil.  Blend ingredients with your hands until the onion is well distributed through the meat.  The oil just holds it all together a bit.    Form this into 6 patties (I probably could have gotten it to go into 7 patties, but 6 was a better number for me.

Warm up a skillet over Medium heat and add a touch of olive oil to that.

When pan is ready insert the first 3 burgers (unless you have a large griddle and can cook all 6 at one time.  If so, I envy you).  Allow to brown about 3-5 minutes per side, depending on your slider's thickness.

Remove the rolls from the oven, and cut open and place patties onto them. Repeat with the last 3 sliders. 

If you would like to turn these into "Krystal" burgers add pickle and mustard.  If you're a castle lover, leave them or add the pickles if you must.

Enjoy!


Monday, September 10, 2012

Open-faced Peach (Nectarine) Stuffed Pork Chops

My "stuffed" version of these pork chops.
See the toothpicks?  Pain in the butt, skip 'em and
make them open-faced.
So, awhile back I was watching Food Network's Paula Deen show.  She was doing a recipe for Peach Stuffed Porkchops.  I really liked the look of them, but there are a few ingredients (cheese) that I'm not too keen on.  But I like the idea and thought I'd mess around with the recipe a bit.

Boy did they turn out great!  Now, there's a little disclaimer here: I put "open-faced" in the title, but the picture is of a stuffed pork chop.  I believe the next time I make this I will do them open-faced, because to close them up, it's pretty, but it is messy and takes longer.

So, without further ado, I give you....

Open-Faced Peach (Nectarine) Stuffed Pork Chops


  • 6 butterflied (if stuffing) or regular 1" thick pork chops.
  • 1 package Chicken Apple Sausage (this is what I used) with skins removed.
  • 1/2 tablespoon dried tarragon.
  • 2 nectarines (cause the recipe says to peel the peaches...like, who has time for that? But if you'd like, use peaches and peel them.)  cut into small bite-sized pieces.
  • Pepper & salt (to taste).


Preheat the oven to 400 degrees.  Prepare a casserole dish (spray it or oil it up).

In a skillet over med-high heat, add oil and saute the chicken sausage till crumbled into small pieces (which is the hardest part of this recipe, since chicken sticks together pretty good).  Once complete, add the peaches/nectarines and tarragon.

(if stuffing, please follow Paula's recipe from this point forward, if not stuffing - continue below.)

Toss the mixture from the skillet into a bowl.  Return the skillet to temperature and add a tad bit more oil.  Brown the chops (just super quick to brown them, so maybe 2 minutes per side) and place the chops from the skillet to the casserole dish.  Over-top, add the sausage/peach mixture and place in the oven.  Bake for 20 - 25 minutes.

Enjoy. (serves 6)

Friday, May 11, 2012

Recipe: Spaghetti Amatriciana

Spaghetti Amatriciana

This is a light sauce that I improvised.  It's light and perfect for Spring/Summer months.  You can used fresh tomatoes or canned, depending on your preference or the season.  Also, don't be afraid to try adding fresh herbs in place of (or in addition) to the Italian Seasoning blend.  I've made so many variations of this recipe because it's so easy and quick.  Enjoy!

Ingredients
  • 1 lb. spaghetti
  • 1 28oz can of diced tomatoes (about 4 - 5 vine-ripe tomatoes)
  • 6 slices of pre-cooked or raw bacon, chopped
  • 1 onion (I use sweet ones when I can find them), diced
  • 2 large cloves of garlic, diced (or use a press)
  • 3 tbsp - 1/4 cup Balsamic Vinegar or Vodka (to taste)
  • 1 to 2 tbsp of sugar
  • Olive oil (about 2 tbsp)
  • Italian Seasoning (eyeball it - about 3 shakes/3 tsp)
While waiting for the water to boil for the spaghetti, place the olive oil in a separate pan and bring to medium high heat.  Add onions and garlic (and bacon if uncooked).  If using cooked bacon, wait till the onions are soft and then add the bacon to the pan.  When those items are cooked, add everything else to the pan and simmer to blend the flavors.

When pasta is done, add sauce to it and stir over medium heat to absorb liquid.

Add cheese, if you must.

Friday, March 9, 2012

Chicken Scampi

Way back in ‘99, right before Y2K hit and everyone thought their computers were going to die, I printed a recipe from Disney’sFamily Fun website.  It was from the kitchen of Jean Knight in Bokeelia Florida.  Giving credit where credit is due is what I’m all about.  However, I can’t find the recipe out there anymore (and this is why printed things should NEVER go away completely).  I still encourage you to go out there and check out some of their cute recipes, but you will not find this one out there among them.  

So, I feel like I can post it here (if anyone ever runs across Ms. Knight, I’d be happy to link to any website she has).  I’m going to write her original recipe verbatim, and then below that, I’ll put my own version.

FYI, this recipe originally garnered a kid friendliness rating of 10 (where 10 is begging you to make it every night) and a difficulty rating of 5 (scale of 1-10, 10 being ridiculously hard).  I can attest to the 10, since Leilani is begging me to make it again.  But I think the 5 is ranking it too high.  If you've shake and baked before, this is only taking in one step further.  I'd give it a 3 on difficulty.


Original Recipe

  • ¼ to 1 lb butter
  • Fresh Garlic
  • Boneless chicken breast (quantity is measured by how much you want to make.  Jean uses about 9 – 12 breasts to make enough for a large group, or 2 – 3 for a small family).
  • Italian Bread Crumbs


In a saucepan, melt butter and cook slowly with as much garlic as you like (the more, the better)(.  Refrigerate until ready to use.  Wash chicken and cut up in bite-size pieces.  Put chicken and bread crumbs in a bag and shake to coat.  Lay chicken pieces out on a cookie sheet.  Warm the butter and garlic mixture.

Meanwhile, put chicken in 325-degree oven for about 20 – 30 minutes, turning the chicken once halfway through.  Pour garlic and butter mixture over the top and bake fo another 15 – 20 minutes.  Serve.

Serves 2 – 30 people; takes 1 hour to cook

My Recipe

  • 1 stick of butter and ¼ cup of olive oil
  • 6 cloves of Garlic
  • Parsley / Italian Seasoning
  • 3 Breasts (because that’s what comes in a package nowadays)
  • Mixture of Italian & Panko Bread Crumbs
  • Salt
  • Spaghetti (or rice, is a great accompaniment)


Cut the chicken into bite sized pieces.  Put chicken in a Ziploc baggie and then add some bread crumbs.  (Yeah, I just guestimate).  Shake ‘em up.  If you need more coating, add some more and then re-shake.

Bake in a dish (I’d not use a cookie sheet because I feel like the juice is going to go everywhere – I use a glass casserole dish) at 325 for 20 minutes.  Turn them only if you remember to do so (I did, because I was starving and was waiting on them).

Meanwhile, since I make this with spaghetti I started boiling the water for that.  Once that’s  going, I started with the “juice.”  Melt the butter & oil with the garlic and some salt (unless you use salted butter…then you may not need it) and Italian Seasoning (and I happened to have some fresh parsley, so I stuck that in too).  Melt it over warm heat.  You may even want to add a splash of lemon or wine to it at this point…but I didn't.

After the 20 minutes is up, I turned the oven up to 425/broil (not too high on the heat); added the sauce and stirred the chicken .  I broiled for about 10 - 15 minutes just to brown the tops and make them all crispy.

Serve over the spaghetti or rice.

Served my family of 3, plus leftovers for 1 the next day.  Took too long for me to cook, which is why I sped it up with the broiler.